
Example 2: Analysing a real network with a sniffer
Introduction
In this example, we will cover the basic steps to analyse a real 6LoWPAN network using a Contiki-based sniffer module.
Configuring the sniffer
Getting the hardware
To begin, you need a Contiki-compatible platform with an 802.15.4 radio and a USB connector. At the time of this writing, Contiki doesn’t provide a standard & generic sniffer module allowing to configure the 802.15.4 channel, so we base our sniffers on an existing Contiki application provided by the Sniffer 15.4 project. Although any Contiki-compatible module should work, we have limited our tests to the following platforms: TelosB, CM5000, Z1, Econotag.
Setting user permissions
On Linux, you should configure permissions for the user to access the USB serial devices – it is much better practice then launching Foren6 as root. To grant access to a user account, add that user to the 'dialout’ group:
sudo adduser <username> dialout
Then, restart your session to apply the modifications.
Programming the sniffer
The sniffer application is available on the sniffer branch of our Contiki fork.
To program a Contiki-compatible mote as a 802.15.4:
Make sure you have a proper toolchain set up for your target device. For more info, refer to Step 1 of the official Contiki documentation.
Download the source:
git clone https://github.com/cetic/contiki
cd contiki
git checkout sniffer
Connect your sniffer device. Build & Upload the application
cd examples/sniffer
make TARGET=your_target sniffer.upload
For example, with a TMote/Sky, TelosB, CM5000:
make TARGET=sky sniffer.upload
Note: if you have trouble setting your USB permissions, you will need to run that last command as root.
Selecting the sniffer as input device
Time to open Foren6, assuming you have already followed the Foren6 Installation Instructions
Open the 'Manage Sources’ dialog by clicking the Manage Sources button in the Toolbar or from the 'File’ menu.
In this dialog, remove any existing entries in the top section by selecting each individual element and hitting the 'Remove’ button. If you have followed the previous example, you should see one or more 'pcap’ files which must be removed. Next, add a new source by specifying the three fields as shown below:
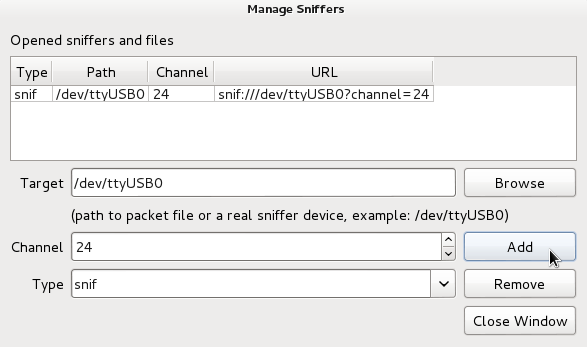
- Target: type the path to the USB device (example: /dev/ttyUSB0)
- Channel: the integer value of the Channel you want to snif (1 to 26)
- Type: select snif
Click the Add button when the above information is entered. If the device is found by the application, it will appear in the list of available device. If your device exists but you get an error at this point, is it likely that the user running Foren6 does not have permission to access that serial device. See the above instructions to grant user permissions, or launch the foren6 application as root (not recommended).
Hit the Close button to return to the main window.
Starting a Capture
Click the Start button (which will now be enabled) to launch a packet capture.

The timeline should start ticking, and new packets will appear in the Event Window. If the packets are properly formatted, the network visualiser will display the sniffed nodes, and connect them to form a reconstructed RPL graph based on the sniffed information.